Magnetic Resonance Imaging (MRI) is one of the safest and most advanced diagnostic tools in modern healthcare—but understanding MRI safety zones and the 4-zone model is critical to preventing serious accidents.
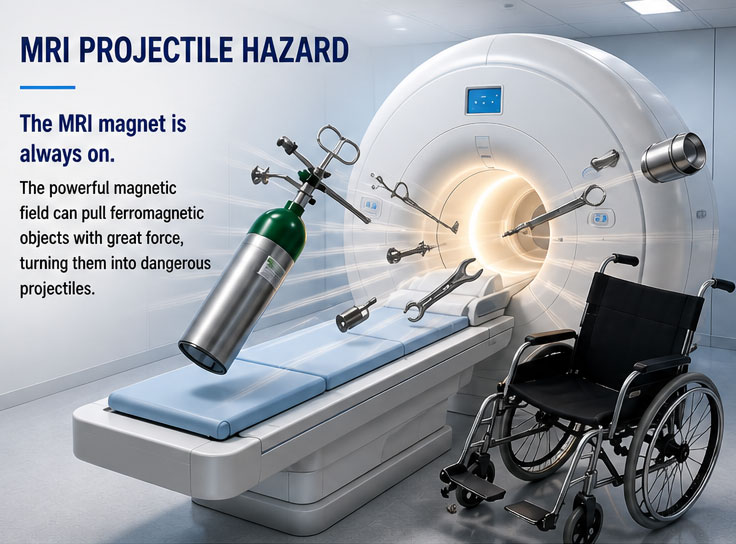
The magnet is always on.
To prevent these incidents, hospitals rely on a structured safety framework known as the MRI 4-Zone Model—a system designed to control access, reduce risk, and ensure every step toward the scanner is intentional and safe.
Even when no scan is running, the MRI system still generates a powerful magnetic field capable of turning everyday objects into dangerous projectiles. For example, even small metal items can become dangerous when exposed to the magnetic field.
Organizations like the American College of Radiology recommend the 4-zone model and establish best practices for MRI safety.
What Are MRI Safety Zones?
The MRI safety zone system divides MRI facilities into four clearly defined areas, each with increasing levels of restriction and screening.

Each zone introduces a higher level of control and restriction, helping identify risks early—long before anyone reaches the scanner room.
Zone I – Public Access Area
Zone I includes spaces freely accessible to the public, such as waiting rooms and reception areas.
At this stage, there are no MRI hazards present and no screening is required.
Key characteristics:
- No restrictions on access
- No MRI hazards present
- No screening required
Zone II – Screening and Preparation
Zone II is the transition area where safety screening begins and patients are prepared.
At this stage, staff complete MRI safety questionnaires, conduct verbal screening, and ensure all metal objects are removed.
What happens here:
- MRI safety questionnaires completed
- Verbal screening by staff
- Change into MRI-safe clothing
- Removal of all metal objects
Zone III – Restricted Access Area
Zone III is the area immediately adjacent to the MRI scanner room where access is tightly controlled. Individuals who have not completed MRI safety screening should never enter this zone without supervision.
Here, strict rules must always be followed to prevent dangerous incidents.
Critical Rules:
- Staff limit access to approved individuals
- Includes the MRI control room
- Magnetic fringe field exposure
- Physical access controls (doors, keycards)
Zone IV – The MRI Scanner Room
Zone IV contains the MRI magnet and presents the highest level of risk.
Critical rules:
- No ferromagnetic objects allowed
- Strong magnetic field always active
- Risk of projectile incidents
- Requires constant supervision
Why the 4-Zone MRI Model Matters
Overall, the strength of this system lies in its layered safety design.
✔ Gradual risk escalation
Each zone introduces a higher level of control and awareness
✔ Redundant safety checks
Patients and staff are screened more than once
✔ Clear physical boundaries
Doors, signage, and access controls reinforce safety
✔ Standardized best practice
Widely adopted across hospitals and imaging centers worldwide.
Together, these layers significantly reduce the likelihood of accidents and help ensure MRI remains one of the safest imaging technologies available.
For example, a maintenance worker carrying tools may safely enter Zone I and Zone II but would require screening and authorization before entering Zone III or Zone IV. This layered approach helps identify potential risks before individuals reach areas where the magnetic field presents a greater hazard.
The Role of MRI Safety Signage
Even the best safety protocols can fail without clear communication.
Because of this, effective MRI safety signage plays a critical role in translating safety protocols into clear, visible guidance within the facility:
- Zone boundaries are immediately recognizable
- Unauthorized individuals are stopped before entering restricted areas
- Staff and patients are constantly reminded of safety requirements
- Compliance is maintained even in high-traffic environments
Common MRI safety signage includes:
- Zone identification signs
- Danger – Magnetic Field Always On signs
- Ferromagnetic screening reminders
- Access restriction signs
- MR Safe, MR Conditional, and MR Unsafe labeling
Implementing an effective MRI safety program goes beyond protocols—it requires clear communication at every stage. Explore how properly designed MRI safety signage and labeling systems can help reinforce safety, improve compliance, and support your facility’s daily operations.
FAQ: MRI Safety Zones
What is Zone IV in MRI?
Zone IV is the MRI scanner room where the magnet is located and where the strongest magnetic field exists.
Who can enter Zone III?
Only individuals who have completed appropriate MRI safety screening and have authorization to enter.
Why are MRI safety zones important?
They help prevent projectile incidents, unauthorized access, and other MRI-related safety hazards.
Is the MRI magnet always on?
Yes. Most clinical MRI systems maintain a constant magnetic field, even when no patient is being scanned.
Final Thoughts
MRI safety isn’t just about advanced technology—it’s about discipline, process, and awareness.
The 4-zone model ensures that every step toward the scanner is:
Intentional. Controlled. Safe.
Ultimately, in an environment where invisible forces can cause real harm, even a single mistake can have serious consequences. That’s why clearly implemented MRI safety signage plays a critical role in maintaining safe and controlled MRI environments.